Tuesday, February 26, 2019

Push Aurelia => Electron build

Now that we have added an Electron skeleton app to our project it is time to integrate the Aurelia project into the Electron project so that we can build for the desktop.

Merge Aurelia => Electron

The first step will be merging the Aurelia project into the Electron project so that when we run the Electron project we will be launching the Aurelia project, much like we did with Cordova.

The good news is ... it is relatively simple to do. The Electron project loads the app/main.js file which in turn loads the app/index.html file. All we have to do is copy our index.html file from the root and it's associated files into the app directory and voila ... Aurelia running inside Electron ... sweet !

There is one small gotcha which we will fix first. The integration of Aurelia and Electron causes some DOM conflicts with require, export and module keywords. There is a simple fix to avoid this from happening. We add a script to the index.html file that corrects the DOM definitions for Aurelia. This script runs after Electron has loaded so it does not impact the Electron functionality.
This is a known issue that effects most node based libraries. You can read about it here.
  1. Open index.html in the editor from the project root
  2. Add the following immediately before the <script src="cordova.js"></script> tag


  3. Your index.html file should look like this

That's it. Next we need to push the Aurelia files to the Electron project

Push Aurelia => Electron

The first thing we need to do is address a small shortcoming in the Aurelia copy-files routine that we used previously to copy files into the Cordova project. We want to continue copying the files to the Cordova project as well as copy them to the Electron project. The copy-files routine does not support multiple destinations and does not allow us to add the same file more than once. This creates a challenge for us. We could duplicate the copy-files routine but that violates the DRY mantra. The best solution is to modify the copy-files routine to support multiple destinations.
  1. Open aurelia_project/tasks/copy-files.js in your editor
  2. Change the code to the following. You can download the file here.

This modified routine will now accept an array of destinations for each instruction.
Next we need to add our new destinations to the aurelia_project/aurelia.json file
  1. Open aurelia_project/aureia.json file in your editor
  2. Change "platforms/browser/www/cordova*.js": "scripts" to  ["scripts", "app/scripts"]
  3. Change "platforms/browser/www/plugins/**/*.js": "scripts/plugins" to ["scripts/plugins" , "app/scripts/plugins"]
  4. Your file should look like this

Remember, the copy-files routine runs "pre build" and we are using it to ensure the Cordova scripts and plugins are included in the build.

NOTE: As of this writing I have logged a feature request with the Aurelia CLI team to add this functionality to the Aurelia project. If it is picked up by the team and included in a release then you will not have to make this change to copy-files.js on new projects in the future!

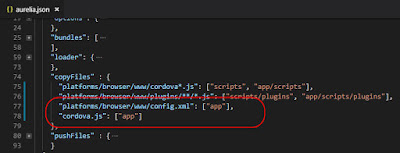
We need to add two more files to the copy-files routine for Electron. We need the platforms/browser/www/config.xml and the cordova.js shim file from the root so that the Cordova browser platform can run inside the Electron app.
  1. Open aurelia_project/aureia.json file in your editor
  2. Add "platforms/browser/www/config.xml": ["app"] to the copyFiles node
  3. Add "cordova.js": ["app"] to the copyFiles node
  4. Your file should look like this

Next we want to to push the Aurelia "post build" files to the Electron app directory.
  1. Open aurelia_project/aureia.json file in your editor
  2. Add "app" to the pushFiles/targets node
  3. Your file should look like this

Next we need to do a little housekeeping.

  1. Open the .gitignore file and make the following changes

  2. We are only interested in saving the app/main.js file and the app/package.json file. All other files and folders are dynamic and do not need to be stored in the source code repository.

That is it for changes. Let's test our Electron app!

  1. Open a command prompt
  2. Run command 'npm start'
  3. The Electron app should open on your desktop

  4. Have a look in dev tools. Notice that app has loaded the Cordova libraries and started Aurelia
    Add caption

Now let's build an installable package

  1. Open a command prompt
  2. Run command 'npm run dist'
  3. The compiler will build an installable for your local environment. This means an exe file for Windows machines or a dmg package for Macs.

  4. The installable package is located in the dist directory.
    Add caption
  5. Go ahead and install it and then launch the app from the desktop.
    Add caption


Now I will swing over to the Mac and test our build for the Apple platform.

  1. Open a terminal in the project root
  2. Run command 'npm run dist'

  3. Look in the dist folder

  4. Install the dmg and open the app

  5. You should see the Cordova plugins load and the Aurelia app has started without any errors logged

We now have a single code base that can run in a browser, Android device, IOS Device, Windows desktop and MAC desktop ... mission accomplished!

My next blog will recap the various steps needed to build the solutions as well as a complete list of the multitude of command line instructions for this project. I will also introduce some automation to help you simplify the command structure and improve productivity.

Sunday, February 17, 2019

Desktop Support - Electron

Electron

Now that we have a stable framework with mobile build capabilities it is time to introduce Electron into the mix. Electron provides us with build scripts to package our SPA for desktop installations across Windows, Mac and Linux operating systems. It also allows us to add OS specific functionality like right click context menus, printing, etc. to our desktop builds.

Just to recap a little. Our Aurelia SPA framework reduces a (possibly) very complex web application into a nice tidy package, consisting of a handful of html, css and javascript files that can be run as a website in any browser. Cordova can use the Aurelia build as source to produce installable packages for Android and IOS mobile devices. Electron can use the Aurelia build to produce installable packages for Windows, Mac, and Linux desktops. This is the "Holy Grail" we have been chasing for quite some time now. A single simple javascript framework that can be packaged and installed in most of our modern day environments be it desktop or mobile!

Let's get started. First we will add Electron to our project.
  1. Open a command prompt in the root folder of our project.
  2. Run command 'nvm use 10.14.0'
  3. Run command 'npm install electron --save-dev'
We do not need to install Electron globally like we did with Aurelia and Cordova. We install Electron as a development dependency which means it is not included in the Aurelia build bundled scripts. Since Electron is basically a builder (same as Cordova) it is not relevant to the deployed application, therefore not included in the Aurelia build.

Next we will create a skeleton Electron project. Unfortunately Electron does not have a 'new' command to create a skeleton like Aurelia and Cordova. Fortunately the skeleton only requires a new directory, a couple of files, and some small changes to our existing project.
  1. Create a new folder in the project root named app
  2. Create a new file in app directory called package.json
  3. Edit the file with the following code

  4. Create a new file in app directory called main.js
  5. Edit the file with the following code or download it here


  6. Create a new file in app directory called index.html
  7. Edit the file with the following code

  8. Our new directory should look like this

  9. Open package.json located in the project root in your editor.
  10. Add the following at the bottom of the file

That's it! We are ready to run our Electron skeleton project.
  1. Open command prompt
  2. Run command 'npm start' 
  3. An Electron window should open and display the skeleton app

Don't confuse this with our Aurelia 'Hello World' app. This is a new Electron app that we just introduced into our project.

Let's recap again. There is a lot going on now and it is easy to loose track of what we are doing.
  • The Aurelia app is launched with 'au run --watch' command in the root directory
  • The Aurelia file watchers automatically push changes to the Cordova app
  • The Cordova app is launched with 'cordova run (browser/android/ios)' command in the www directory
  • The Electron app is launched with 'npm start' command in the root directory
NOTE: The Electron app is launched using a npm script that we defined in the package.json file. This is necessary because Electron is not installed globally. It is possible to add additional npm scripts for all of our tasks to create a set of standard commands that we could use to manage builds in our project if you find that remembering the various commands becomes cumbersome. 


Next ... we need to be able to build our Electron app into installable packages for desktops.

Electron Builder

To build our app into installable packages we will use the Electron-Builder package.
  1. Open a command prompt in the project root.
  2. Run command 'npm install electron-builder --save-dev'
The builder requires some image resources to use when creating the installable package. You can read more about it here.
  1. Create a new directory called build in the root of the project.
  2. Open a browser to https://iconverticons.com/online/
  3. Upload splash.png (your original artwork file) from the res folder.
  4. Download the ico, icns and 256x256 png files created by the converter
  5. Rename the ico file to icon.ico and save it in the build directory
  6. Rename the icns file to icon.icns and save it to the build directory
  7. Rename the png file to background.png and save it to the build directory
  8. Your build directory should now look like the following


We also need to add some build instructions to the package.json file in the project root
  1. Open package.json from project root in your editor
  2. Add the following node

     
  3. Add the following instruction to the "scripts" node

We are now ready to build our Electron app. Remember, we are building the Electron skeleton project we just created. The next blog will deal with pushing the Aurelia app into the Electron app using the same process we did for the Cordova app.
  1. Open a command prompt in the project root
  2. Run command 'npm run dist'

  3. You will see a new dist directory appear in the project that contains the build we just performed

The 'applewood Setup 0.1.0.exe' file is our installable package for Windows desktops.
Go ahead and install it and click the desktop icon to open the app!


If you open the Windows Control Panel and go to Programs and Features you will see the app installed as a normal Windows software package. Sweet !!!!!


We also need to do a little housekeeping.
  1. Open .gitignore file in the editor
  2. Add the following

This will prevent the dist folder from being saved in your source repository.


NOTE: You may have noticed that to run the electron project we entered 'npm start' however to build the project we used 'npm run dist'. NPM comes with some built in aliases and start is one. The command 'npm start' is equivalent to 'npm run start'. You can read more here.


Now it's time to swing over to the Mac and test our build for the Mac desktop.

NOTE: If you have been following along on a Windows machine make sure you have committed your changes to the project repository and then retrieve the latest code from your repository using GIT on your Mac.

  1. Open a terminal window
  2. Run command 'nvm use 10.14.0'
  3. Run command 'npm install' to download the electron packages.
  4. Run command 'npm start'
  5. We should see our electron app open

  6. Run command 'npm run dist'  to build our installable package

  7. Inspect the dist folder

  8. Double click the 'applewood-0.1.0.dmg' file to install it.
  9. You should see the standard installer box appear. Drag the applewood icon into the Applications folder.

  10. Open Launchpad and you will see your installed app icon

  11. Double click the icon to run it.
We now have successfully added an Electron skeleton to our project and built an installable package for both Windows and Macs from a single code base!

Next up - we will integrate our Aurelia project into the Electron project.

Time for a rest and a cold one!


Monday, January 28, 2019

Mobile Resources (images and icons)

Now that we have the Aurelia project integrated in the Cordova project and can successfully build and deploy to mobile devices, it is time to get rid of the default Cordova icon and splash screen image and replace them with something a little more to our liking.

Resource Files

Anyone who has built an app for Android or IOS understands the pain and frustration of having to create and integrate the voluminous number of image assets that each platform requires.

In my travels I have discovered a handy online tool to help ease the pain. It isn't perfect, but it is close and can certainly remove hours of resizing, cropping, and configuring these images.

Before we get to the tool itself we must create two image files. One for our icon and one for our splash screen. I'm not a photoshop expert so I won't even go there. I will leave it up to you to cobble together some cool images for your app.

What I can tell you is that the images should be relatively high resolution and quality. The online tool is going to re-size them and crop them to certain parameters so you should also strive to keep your artwork and message in the center of the image and do not use the entire canvas. Leave a relatively large margin around the edges. I achieved relatively good results using a 1024 x 1024 icon image and a  2208 x 2208 splash image. I also saved them as png images so that they are lossless and can be easily resized.

I suggest you save these files in the root/res folder. This is not required, but it is a good place to keep them so that if you require them in the future they will be easy to find.

Now that we have created our two base images it is time to let the online tool do it's magic.
  1. Open your browser to https://www.resource-generator.com and follow the instructions.
  2. Choose your two files and then click the big green button.

  3. The generator is going to crunch away and produce a zip file and a configuration segment.
  4. Copy the configuration segment and paste it into config.xml file in the root of your project.


  5. Download the zip file that contains the generated resource files.

  6. Open the zip file and you will see two png files and a res folder. NOTE: These are not the same png files you uploaded, but resized versions to be used in our app. Do not save them to the res folder because they will overwrite our high res versions. If you want to save them to the res folder then you should first rename the originals.
  7. Copy the icon.png and save it somewhere handy. We will be converting it to an ico file a little later.
  8. Create a new folder in the root of our project called images and copy the splash.png to this folder.

  9. Open the res folder in the project root.
  10. This folder contains an icon directory and a screen directory. Delete both of these directories. They contain the default Cordova resource files.

  11. Open the res folder in the zip file.

  12. Copy the icons and screens directories into the res folder in the root of our project. NOTE: The directory names are a little different than the originals (they end in s). This is by design. Do not change them back to singular!

We now have all of our mobile resources inserted into our project. The res folder contains all of the images needed by the Cordova Android project and the Cordova IOS project. If you decide to use the splash screen in the Cordova browser project, it will use the splash.png in the new images folder.

Next is to replace the favicon.ico file in the root of our project.
  1. Open your browser to https://icoconvert.com and follow the instructions.
  2. Choose the icon.png file that we saved to a handy location earlier.
  3. Click the Upload button and let the tool do it's magic.
  4. You can crop your image or apply a style if you desire. I am just leaving my image as is.
  5. Select the 'favicon for your website' option

  6. Click the Convert ICO button
  7. Click the link to download your new ico file
  8. Delete the existing favicon.ico file from the root of the project.
  9. Copy the downloaded file to the root of the project and rename it to favicon.ico
Now we have our new image assets in the res folder and a new favicon that will be used when we run our project in a browser. Last thing to do is run cordova build from the command prompt. This will copy all our root/res images to the correct locations in the Android project and the IOS project.
  1. Open a command prompt in the root of our project.
  2. Run command cd www
  3. Run command cordova build
  4. Run command cordova run android
  5. We should see our new images on the splash screen and the app icon should be replaced with our new image.


  6. Run command cordova run browser
  7. We should see our new favicon in the browser tab (you may have to refresh the browser to replace the old cached image)

NOTE: The resource configuration data that we inserted in the root/config.xml file instructs the Android project and IOS project how to link the various assets for each project. Take note of the path in the instructions. It uses the icons and screens (plural) directories that we copied from the downloaded zip file. If you make any changes to the res directory or to the resource configuration in the xml file then you must run cordova build to push these changes to the appropriate Cordova projects!

That wraps up the resources portion of this blog. If you are interested in learning more about Android resources you can start reading here. Xcode may complain about a couple of missing resources depending on the version of Xcode. Sometimes the resource tool is lagging behind recent screen resolutions used by Apple. There is a good tutorial here if you are interested in learning more.

I think it is time for another beer ... :)
Next up is adding and integrating Electron to our project.